How to Change Margins In Google Docs
Quick Navigation
[/intro]
Margin in Google docs is just a white empty space that surrounds your document from all four sides adding a distance between the writable area and edges of your page. However, you can only set margins for the entire document and not for a single page which means that whatever you set the margin that will get applied to the whole Google Docs Document.
Earlier we also covered topics like How you can see a word count in Google Docs or How to make Table of Contents in Google docs which you can also read to gain some extra knowledge about Google Docs.
How to Change Margins In Google Docs
There are two methods using which you can set the Margins in your document and the easiest is to simply use the Ruler tool to adjust the margin of your document and to do that Simply go to docs.google.com and sign in with your Credentials. After you are successfully signed in to your account you can open a document from your docs or create a new one with some text.
Now Head over to the Ruler section in Google Docs and just adjust the Ruler to whatever margin you want your Document to have.
As you can see in the image above There are two Red Arrows pointing to the two Blue Dots which is the adjustment tool for your Ruler, Simply drag that tool to the left or right to Adjust the Margins in Google Docs.

In the above image, we have changed the Left margin by simply using the Ruler Adjustment option and sliding it little to the Right side. You can also set the Right margin according to your preference by using the same Blue Arrow Ruler adjustment tool.
The ruler tool can only set the left and Right margin in your document and if you want to set full page margin in Google docs then you have to use the Page Setup Option.
[featured]
How to Set Margins In Google Docs by Using Page Setup Option
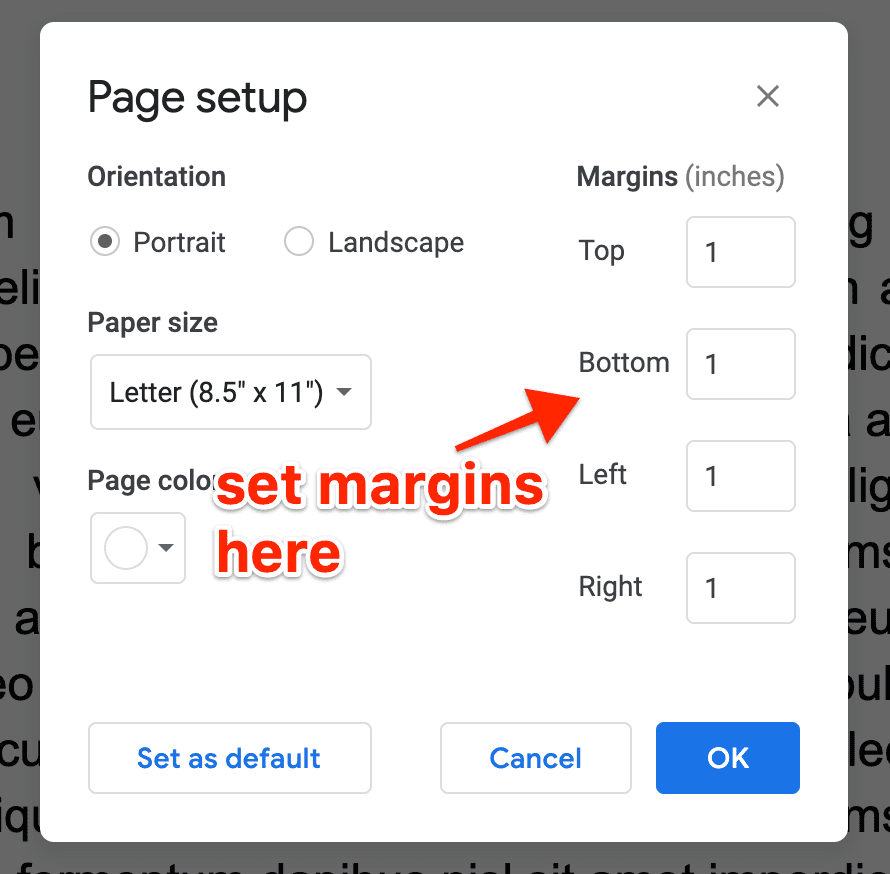
With the above option you can only set margins for left and right side and but with Page Setup option you can set margins for Top, Bottom, Left and Right. Also, You can set a custom margin for each side along with Page orientation and Page color.
Follow these steps to Set Margin using the Page Setup tool on Google Docs:
- Go to Google docs and open a Document.
Visit docs.google.com and login with your Google Account if required. Upon Sign-in you will see a list of Documents saved on your Google Docs. Select any Document or create a new one and add some text to it.

- From Menu bar select File >> Page Setup
On the Google Docs screen, you will see a menu bar with options like File, Edit, View, Insert. We will select “File” from the option and from the Drop-Down list select “Page Setup” by scrolling down a little.

- Set your Page margins for all sides (In inch).
After you click on Page setup option a new popup window will open with all the different page setup options like Page orientation, Page Color, Page Margins. Under Page margins, you can set different page margins for different sides. Make changes according to your preference.

- Click “Ok” to Save Changes.

That’s it you have to do. By using any of the above-given steps you can easily fix margins in Google Docs. If you want to fix just the Left or Right Side margin then using the Ruler tool is the perfect option. Also if you are not able to see the Ruler tool in your Document then just click on the “View” option from the menu bar and check for the tick sign in front of the “Show Ruler” option, This will enable Ruler in your Google Docs document.
Also Read:
How to Strikethrough Text in Google Docs
How to See Word Count in Google Docs
How to Add Double Space in Word Document
How to Make a Table of Contents in Google Docs
How to Block Someone on Instagram